How I Clean My Brushes
This is a simple tutorial I did on cleaning brushes.
There are thousands videos like this but I just wanted to do one to get hang of how I use my editing program for future video-editing-skills.
Here you go with my brush cleaning video, nothing fancy at all, but I hope you'll like it!
Basically I use regular soap instead of brush shampoo since I just find it as good. For real hair brushes I use my regular shampoo and with the larger face brushes I also use a conditioner just to make it soft and help with the shaping of the brush.
Minimini Haul
Since I needed a new face wash and a new eyeliner I went out and bought it today.
Facial wash wise I had a soap that I loved and that took away makeup like a dream but they stopped making it and since then I've been on the look for a new one but haven't found any that have been as good so now I tried a new one again and hopefully it'll be great!
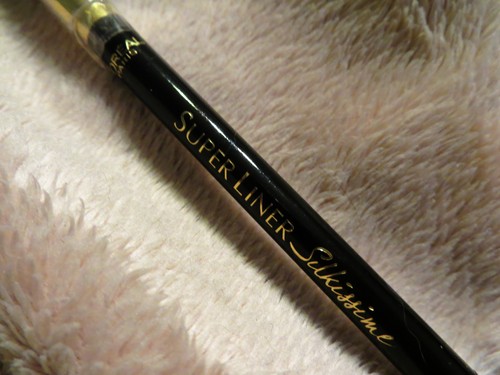
Eyeliner wise I've been using Maybelline Master Drama Kohl Liner basically since it first came out and I love it. It's waterproof (though smudges a little) and just great. But it's soooo soft that everytime I sharpen it it kinda breaks again. Anyways now the cap is longer then the liner and I actually went out to buy another one but found one from L'oréal instead that's supposed to be waterproof and smudge free so lets see how it does.
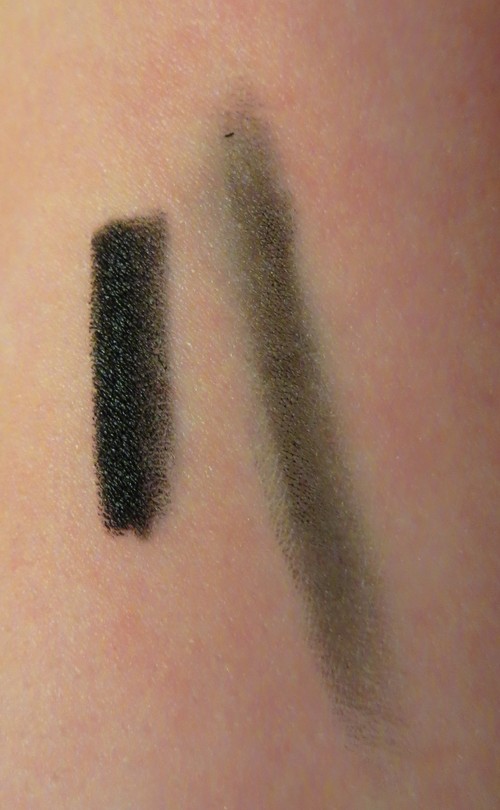
As far as I can say it is rather soft and extremly waterproof, tried to wash it of with my new face wash and after alot of rubbing I still have some residue on my arm. It's very black aswell but seem to have a shiny finish.
More reviews about the product will come when I had the time to try them out a little bit.

L'oréal Super Liner Silkissime and Olay Essentials Refreshing Face Wash
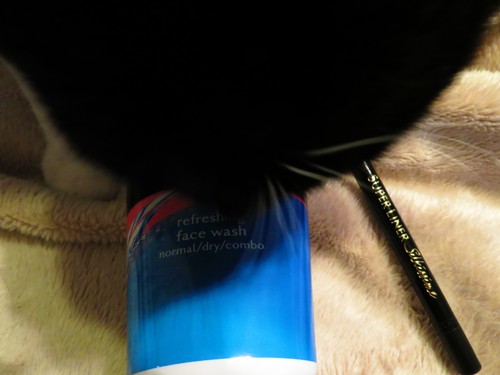
Pisco wanted to see if I got him anything and refused to move :P
As for the rest of my life I had an exam yesterday and have another one on Friday so I don't have alot of time for the blog.
When Inspiration Runs Low
Lately I've been in this state where I really want to do fun make up looks but I just don't have the inspiration to it. It kinda feels like I've done everything, used every shadow, every technique, everything.
Now of course this isn't the truth but I just can't think of inspiring things to do. I think we've all been there.
My solutions so far:
Google something. Like anything (jibberish like nhigoewhurg works fine), then look at the picture-results and try to find a picture I like and can get inspiration from.
YouTube something. Now here I'm at a halt because I really feel I've done everything I like there.
Ask friends to come up with colour suggestions. Usually I ask for one or two colours and whatever they say I have to use it!
My newest (and probably most challenging) addition
This is not a new website or anything but I decided to make a list over my eyeshadows in the 100 pc palettes from ELF, giving each shadow different names (like 1.1, 1.2, 2.3 and so on) and writing them in the list, then I created the randomized list. This won't give you a certain number of shadows to use, just swap around the placement of the shadows you put in so I used their number generator and chose a range from 1-10 and it gave me number 5.
So I decided to use shadows 1-5 from the list I created.
Obviosly this can give you totally horrendous colour combinations, but that's the fun and challenging part. How to create a look with all the colours given and not end up looking like a clown.
I had such luck that it gave me two purple, a blue, a white and a brown shadow. Nothing to hard to mix.
Of course you can make up your own "rules" about how to use the random-generator. This is just how I did it and I thought it was a fun and different way of deciding what to use.
You could do a "highlighter list", "eyelid list", "crease list" and so on if you want to make sure to get it all (otherwise you might end up with a random number of dark shadows but nothing colourful or highlighting)
Also, if you want to this more than once I suggest you save your shadow-list somewhere on the computer so you don't have to make a new list every time you want to do a new look. That's probably the most time consuming part.
Here's the look I created (sorry for the low quality editing, I just wanted to do this really quick before I wen't to work)
Ps: parts 2 & 3 of the Marble Palette Review will be up soon, I just can't find the time to edit the pictures!
ELF 100 pc Marble Eyeshadow Palette Review Part 1
There's a little funny story about when I bought this palette. It was the weekend before my birthday and ELF (eyes lips face) had an offer so I decided to order but wasn't sure if I should since I didn't know if my sister had bought it for me for my birthday or not.
However I decided to buy it and on my birthday I got the gift from my sister, start to unwrap it but stop and she said "Don't tell me you did something stupid" and I said "I think I have", yes my sister bought it for me! But then I just gave my to mum instead when it arrived so problem solved!
On to the actual review.
The name of the palette says pretty much everything, it is a palette with 100 shadows and some of them (11 if I counted right) have a marbled effect, meaning the shadow has two different colours. This is not an overspray its genuinely two shadows from top to bottom (can't really swear about that since I haven't hit pan on any).
The size of the palette is ~ 23.5 x 19 cm and about 1.5 cm high. The shadows are ~ 1.5 x 2 cm which is a decent size for the price!
The range of colours are amazing, there are alot of neutrals (about half the palette) and alot of brights with a lot of different textures. Unlike the "regular" 100 pc Eyeshadow Palette this one has alot of matte colours and not mainly frosty as the regular one has. This was probably the selling point for me, not the marble shadows. All in all the marble palette is much more appealing with the bright colours than the regular.
For those who love bright colours like me I recommend to buy both since the colours are really different, if you only want to buy one of them, go with the marble. If you prefer neutrals you could go either way, the regular have more darker browns and the marble one have more light beige/golden colours but I wouldn't get both since they are pretty much the same on the neutral side.
Now to the quality of the shadows.
I find this one to be a little less powdery than their other shadows and the shadows are alot softer. It's really like petting a cat to put them on your fingers. They are quite hard to swatch (which you will see in the swatch-parts of this review) especially the matte colours, but as long as you use a primer/base they look beautiful on the eyes!
They are pigmented and stay vivid all day long (again, as long as you use a primer/base). I wouldn't use them wet since this will ruin the colours (did that mistake with my other 100 palette).
As for the marbled eyeshadows, I'm not really a big fan of them usually since they usually always become a dirty mix of the colours, but that's not the case for these ones. The colours don't really mix with each other (you'll see what I mean when you see the swatches) so you either get two colours or only one of them will show up, with an exception for the frosty/shimmery colours where the shadows mix and becomes beautiful colours. But I will talk a little bit more about that in the swatch-posts.
For this review not to be super long and crowded with pictures I will include close ups and swatches in parts 2 and 3!
You can find the palette here
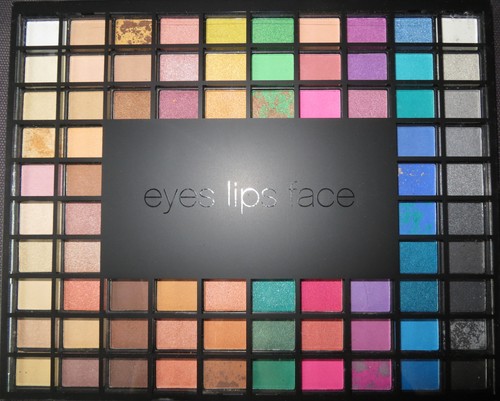
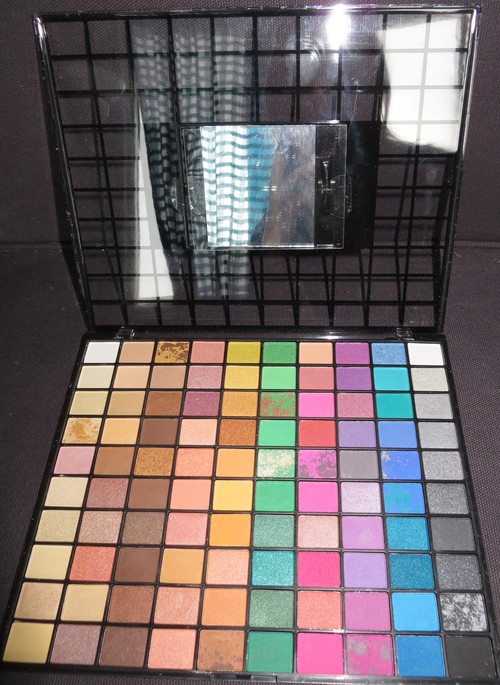
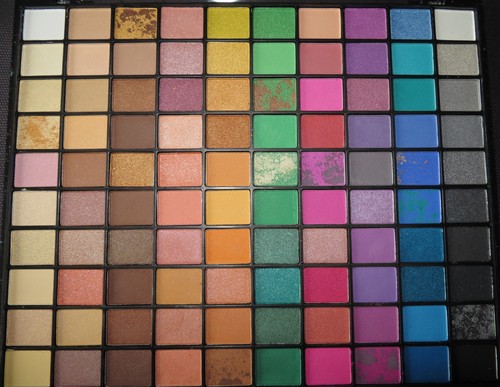
Sorry for the pictures being skew, it's not the easiest palette to photograph.
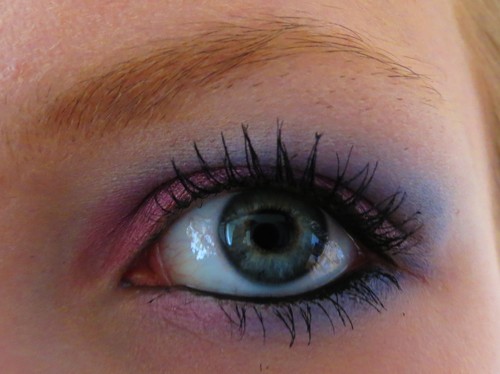
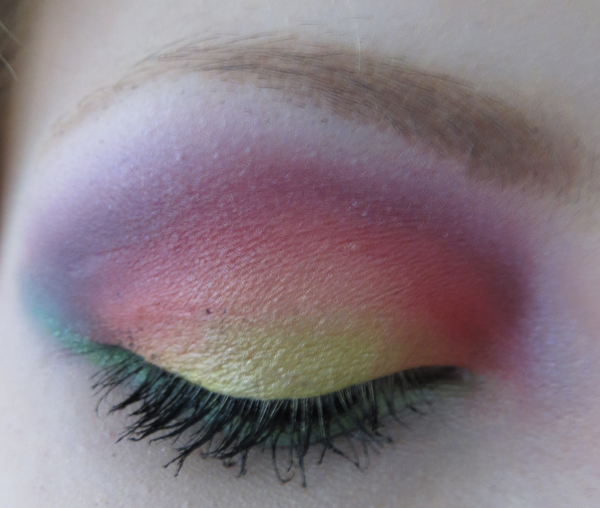
Until next parts here's a look made completely with this palette (over NYX Jumbo Eyeshadow Pencil in Milk)
MOTD (Make-up of the Day)
Trying to get back to blogging and therefore I have to show you the look I did today before I got to work.
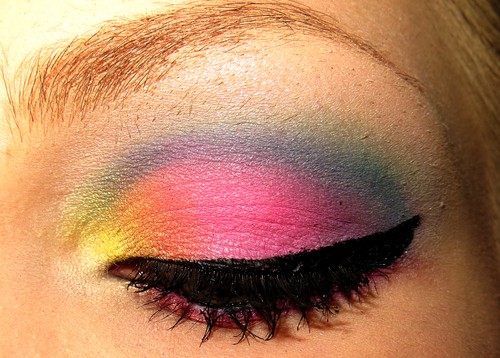
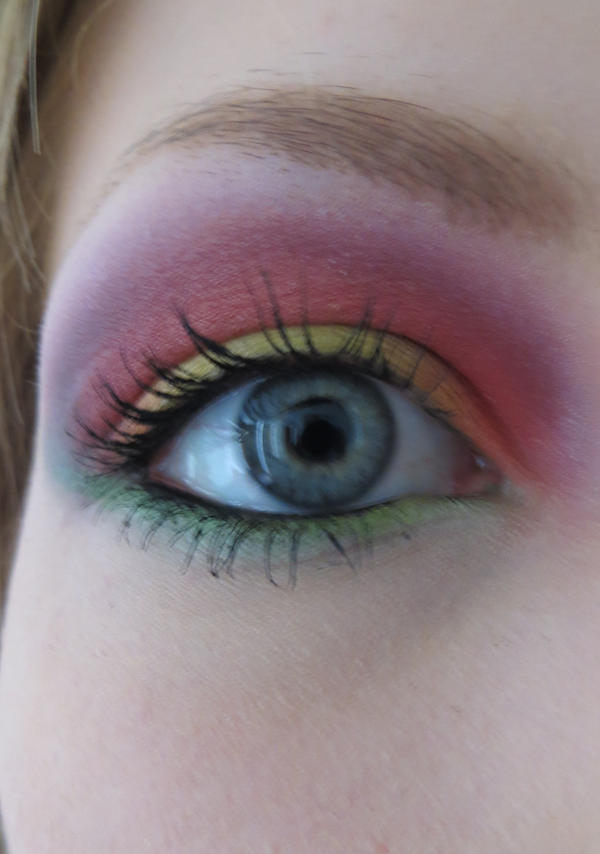
As usual when I don't know what I'm going to do I ask someone (this time my boyfriend) about what colours I should use. Though today he wasn't that helpful as he wanted me to mix orange with either red or yellow (well I do use those colours) but I thought it was quite boring so I googled this picture (well I googled "nature" and saw this picture) and made an eyelook out of it.

Thought it was so pretty colours in it that I just had to make something of it.
Again, since I took these pictures right before I had to go to work they're not the greatest quality but bear with me!

Products used:
Face:
MaxFactor Ageless Elixir Foundation in Warm Almond nr. 45
Garnier Tinted Eye Roll-on
Viva la Diva 3 In One Foundation in Medium
E.L.F High Definition Undereye Setting Powder
Isadora Anti-Shine Mettifying Powder in Matte Blonde nr. 30
Lumene Artic Glow Mineral Blush in Blooming Rose nr. 2
Eyes:
E.L.F. Eyelid Primer in Sheer
NYX Jumbo Eyeshadow Pencil in Yellow
ZAFi Eyeshadow Shimmer Stick in E2 (?!)
GOSH Trio Eye Shadow in Tropic Fever (yellow)
Make Up Forever Blush in Mission (pink/coral)
E.L.F. 100 pc Eyeshadow Palette (orange, burgundy)
E.L.F. Eye Transformer (yellow, green)
E.L.F. Makeup Clutch Palette (green, highlight)
GOSH Velvet Touch Eye Liner in Lemon Soda
Maybelline Master Drama Kohl Liner in Black
Maybelline Pulse Perfection Vibrating Mascara in Black
Lips:
E.L.F. Lip Liner and Blend Brush in Nude Pink
Lumene Smile Booster Lipstick in Nude Beige nr. 3
June Go-To-Product
Some months ago (actually almost a year ago) I bought the Eye Transformer from E.L.F (eyes lips face).
I maybe used it just to try it out but then I just put it away somewhere and kinda never used it again, until recently.
I can probably say it's my most used product of June except for the usual things like foundation, mascara and so on.
You can use it different ways: on it's own for just a bit of colour, on top of an eyeliner/base, on top of other shadows etc etc etc.
Just to give you some pictures on this awesome product I took quick swatches just after I got home from work, bear this in mind since the quality is kinda crappy.
Just to give you some pictures on this awesome product I took quick swatches just after I got home from work, bear this in mind since the quality is kinda crappy.
(Eye Transformer colours from left-right: Green, Yellow/Golden, Red/Pink, Blueishpurple)
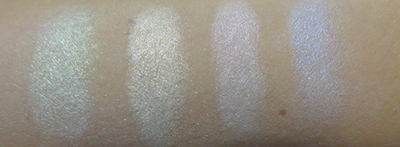
(On top of ELF eyelid primer in Sheer. From left-right green, yellow/golden, red/pink, blueishpurple)

(On top of an black eyeliner. From left-right green, yellow/golden, red/pink, blueishpurple)
Just look at the blueish one!! Seriously, if I could marry it I would :P
It's only £3.75 or €4.50 and it is worth buying!
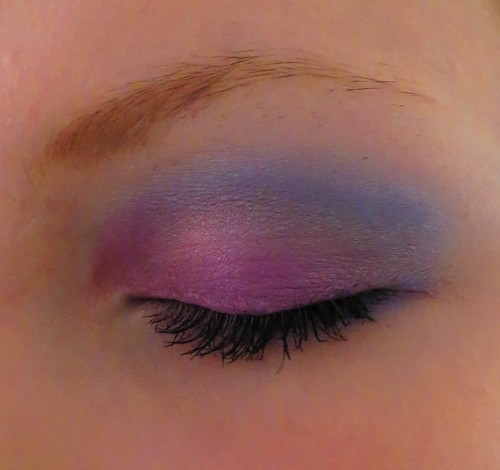
(almost) Complete eye-look with ELF makeup

So this was the makeup of the day for me. Had 20 minutes (after foundation and stuff) to do the eye makeup so I decided to something a bit more fun. I'll go through quickly how I did it just for you to get a clue how much effort it is in this effort-less-looking eye look :P
Products Used: (unless stated otherwise from ELF)
Eyelid primer in Sheer
Studio Cream Eyeshadow in Teal Party (review will be up soon)
Studio Pigment Eyeshadow in Tropical Teal and Breezy Blue
Brightening Eye Colour in Teal Dream (used the teal and nude)
Studio Cream Eyeliner in Midnight
Eyebrow kit in Light
Lumene Natural Code Volume-Maximizing Mascara (only non-ELF-product)
So I started of priming my eyelid from lashes to brow and then I put Teal Party on the lid to slightly above the crease. After that I applied the natural colour from Teal Dream on the browbone and slightly blending the cream eyeshadow. Then I wet my brush and used Tropical Teal (gettin confused by all the teal names yet?!). I like using them wet even though I now used both primer and a base, it's just easier, but I could use it dry aswell. Put it only on the lid up to the crease but not further.
Then I took the teal colour from Teal Dream and put it in the crease and slightly above just to make the blending a little bit easier and make the edges fade (since I noticed it's the exact same colour as Teal Party). Then I wet my blending brush, but only a very little bit. It was bearly damp, but just enough to make Breezy Blue pop a little more. Then I put it in the crease blending upwards and not going to far in the inner-corner of the eye.
I applied eyeliner to upper and lower lashline and also in the waterline. If you're uncertain if your eyes can take their cream eyeliners skip that step and just put in on the lashlines.
I don't have very sensitive eyes, and have only found it to irritate my eyes once during allergy season. But always try a new eyeliner to see if you can use it on your waterline. Slightest itch and you should wash it of immediately!
Put on mascara and do your brows (if wanted) and you're done. The whole eye look took me almost exactly 20 minutes.
MOTD (Makeup of the Day)
So I went to sleep about 6 am I think and now I'm up again thinking of how I should do my makeup today. I suppose I'll do it in the ishockey-team's (the one I'm supposed to cheer at) colours. Red, black, white and a tad bit of yellow. I think I can do something decent with it. And if I have the time I'll show you pictures, even if they won't be of the best quality since I have to use a bad camera, but any picture's better than no picture, right?!
